
Houdini MC can (simultaneously or not) manage the following audio output categories:
- Main theme (This sound starts automatically and continues in a loop while the game is active)
- Additional Sounds (The game master can send these sounds during the game using the <Sounds> tab)
- Alert Tones (These short in time tones are accessible through the <Shortcuts> tab as well as through predefined keyboard shortcuts)
- Sound Events (Based on selected scheduled events)
- Intercom (The game-master communications with the players through a microphone)
- Audio Clues
- Video clues
- Text to Voice
To handle these sound categories, Houdini MC uses 2 different sound channels:
- The default escape room audio output
- The secondary escape room audio output
The default escape room audio output is responsible for
- Main Theme
- Alert Tones
- Sound Events
- Intercom
The secondary escape room audio output is responsible for
- Additional Sounds
- Text to Voice
- Audio Clues
The 2 available channels can operate in parallel, and each channel may or may not reproduce more than one audio category at the same time.
In other words, you can connect up to 2 different sets of speakers, and forward the sound, based on the category it belongs to a specific sound destination. Of course, one can use one set of speakers and forward all the sounds to the same destination (merge the 2 channels)
Go on <Settings->Audio> menu and select a target destination for each sound channel:
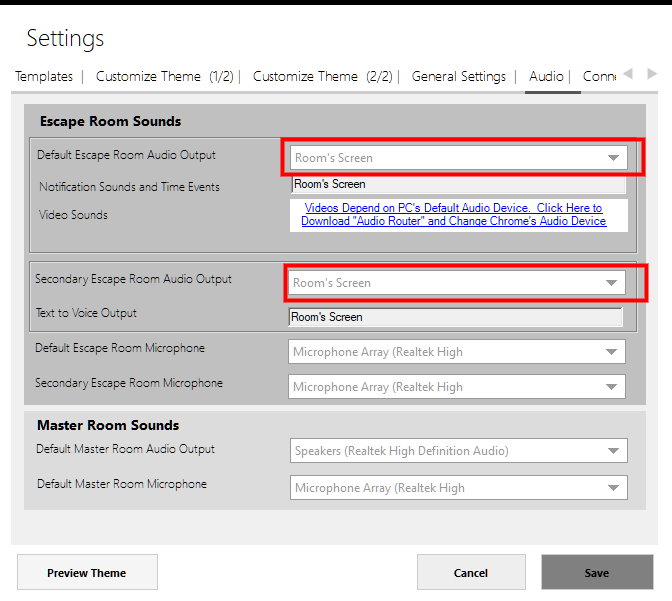
As one can observe, only The default escape room audio output and The secondary escape room audio output fields are editable. Drop-down menus display the available audio destinations. Windows are responsible for the identification of the devices. If a device is recognizable by your operating system, then is listed there.
The same tab allows the game maser to select the “Default master room Audio Output“. This audio output allows the game-master to drive the in-room microphones to a specific device.
The “Room’s Screen” option is selected by default. This option allows Houdini to “compress” all the sound categories into a single pack, and transfer this pack directly to the in-room “device”. But, what is the in-room “device”?
Houdini MC uses a camouflaged Chrome window to display the in-room screen. So in our case, the in-room device is a browser window. What you see on the in-room screen is an HTML page loaded on a Chrome tab. Chrome uses a specific sound destination to reproduce its sounds. If you choose the “Room’s Screen” option for a sound channel, all the sounds of this channel will be managed directly by Chrome’s default set of speakers. So if for example, you choose to cast through chrome-cast the in-room screen, then all the sounds will also be cast. But if you choose a different sound destination for a category and you cast the in-room screen, the sounds of this category will not be cast. In any case, the “Room’s Screen” option is perfect in case you choose to wirelessly transmit the in-room screen.
In the case of HDMI connections, the “Room’s Screen” option is not really useful. The most effective and low-cost solution is to employ, at least for one of the sound categories, as the sound destination, the TV. This option will be listed as an “HDMI connected device“. In this case, the same cable will transmit the content of the in-room screen as well as the sounds of the specific category.
In both cases, the “Room’s screen” and the “HDMI connected device“, you transmit together with the visual content of the in-room screen, the soundtrack of the game, directly on the in-room TV. Especially in the case you choose to employ these options for both sound channels, all the game sounds will be directly forwarded to the TV speakers. From there, you can use the audio output port of your TV and drive the sounds to the in-room speakers. In other words, this solution eliminates the requirement of a physical wired connection between the control room and the in-room speakers.
Of course, in several cases and based on the architecture of the room, there is a need to forward a sound channel to a specific sound destination. In this case, directly connect the set of in-room speakers to the game-master PC and use the <Settings->Audio> menu to make your appropriate selection.
To modify the volume of each sound category, use the <Sounds Console>
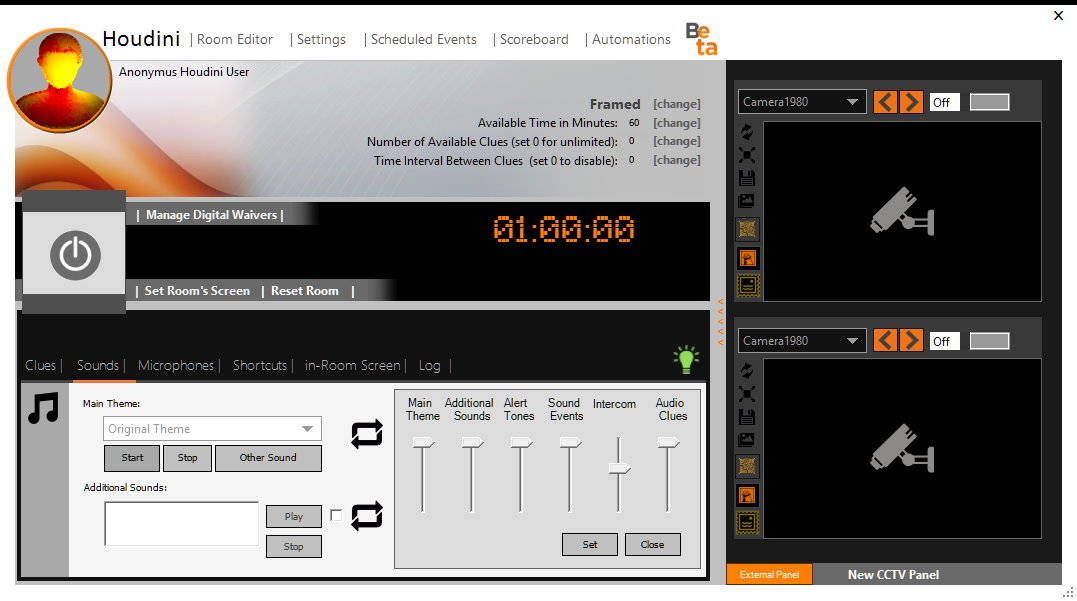
Select the volume of each category and press <Set>. It is worth noting that you can change the sound channel even if the game is in progress. Select <Close> to hide the volume control and select the new sound destination.
So far, so good. But what about video clues?
The Google Chrome browser reproduces the video clues, and unfortunately, the audio part of a video will always be reproduced by Chrome’s default audio device. Google Chrome does not allow you to change its default audio device. But there is a solution:
The new Windows sound context menu includes quick access to the new Sound settings.
- Open Settings.
- Click on System
- Click on Sound.
- Under “Other sound options,” click the App volume and device preferences option.


The first thing you’ll find on this page is the slider to control the system master volume and adjust all sounds. On the right, there are two drop-down menus to select the default speaker and microphone, which are the same settings that you can customize on the Sound page.
At the bottom of the page, you can adjust the volume for specific apps and system sounds as a percentage of the master volume.

Alongside the ability to change the volume for apps and systems individually, this page also allows you to select the default output and input device if you have multiple speaker setups and microphones. So select the Google Chrome application and drive the sound to the sound destination you want.