
The escape room’s in-room screen is fully customizable through the settings menu. Select and customize one of the 30+ preset themes or design your own. Always keep in mind that the customization procedure requires minimal training and support. Use your imagination and make your in-room screen part of the atmosphere. This tutorial aims to help new users to get familiar with the settings interface and the workflow of theme shaping. Starting from the initial (Saw movie) theme, this step-by-step guide will allow you to transform your in-room screen to the one illustrated in the following image.
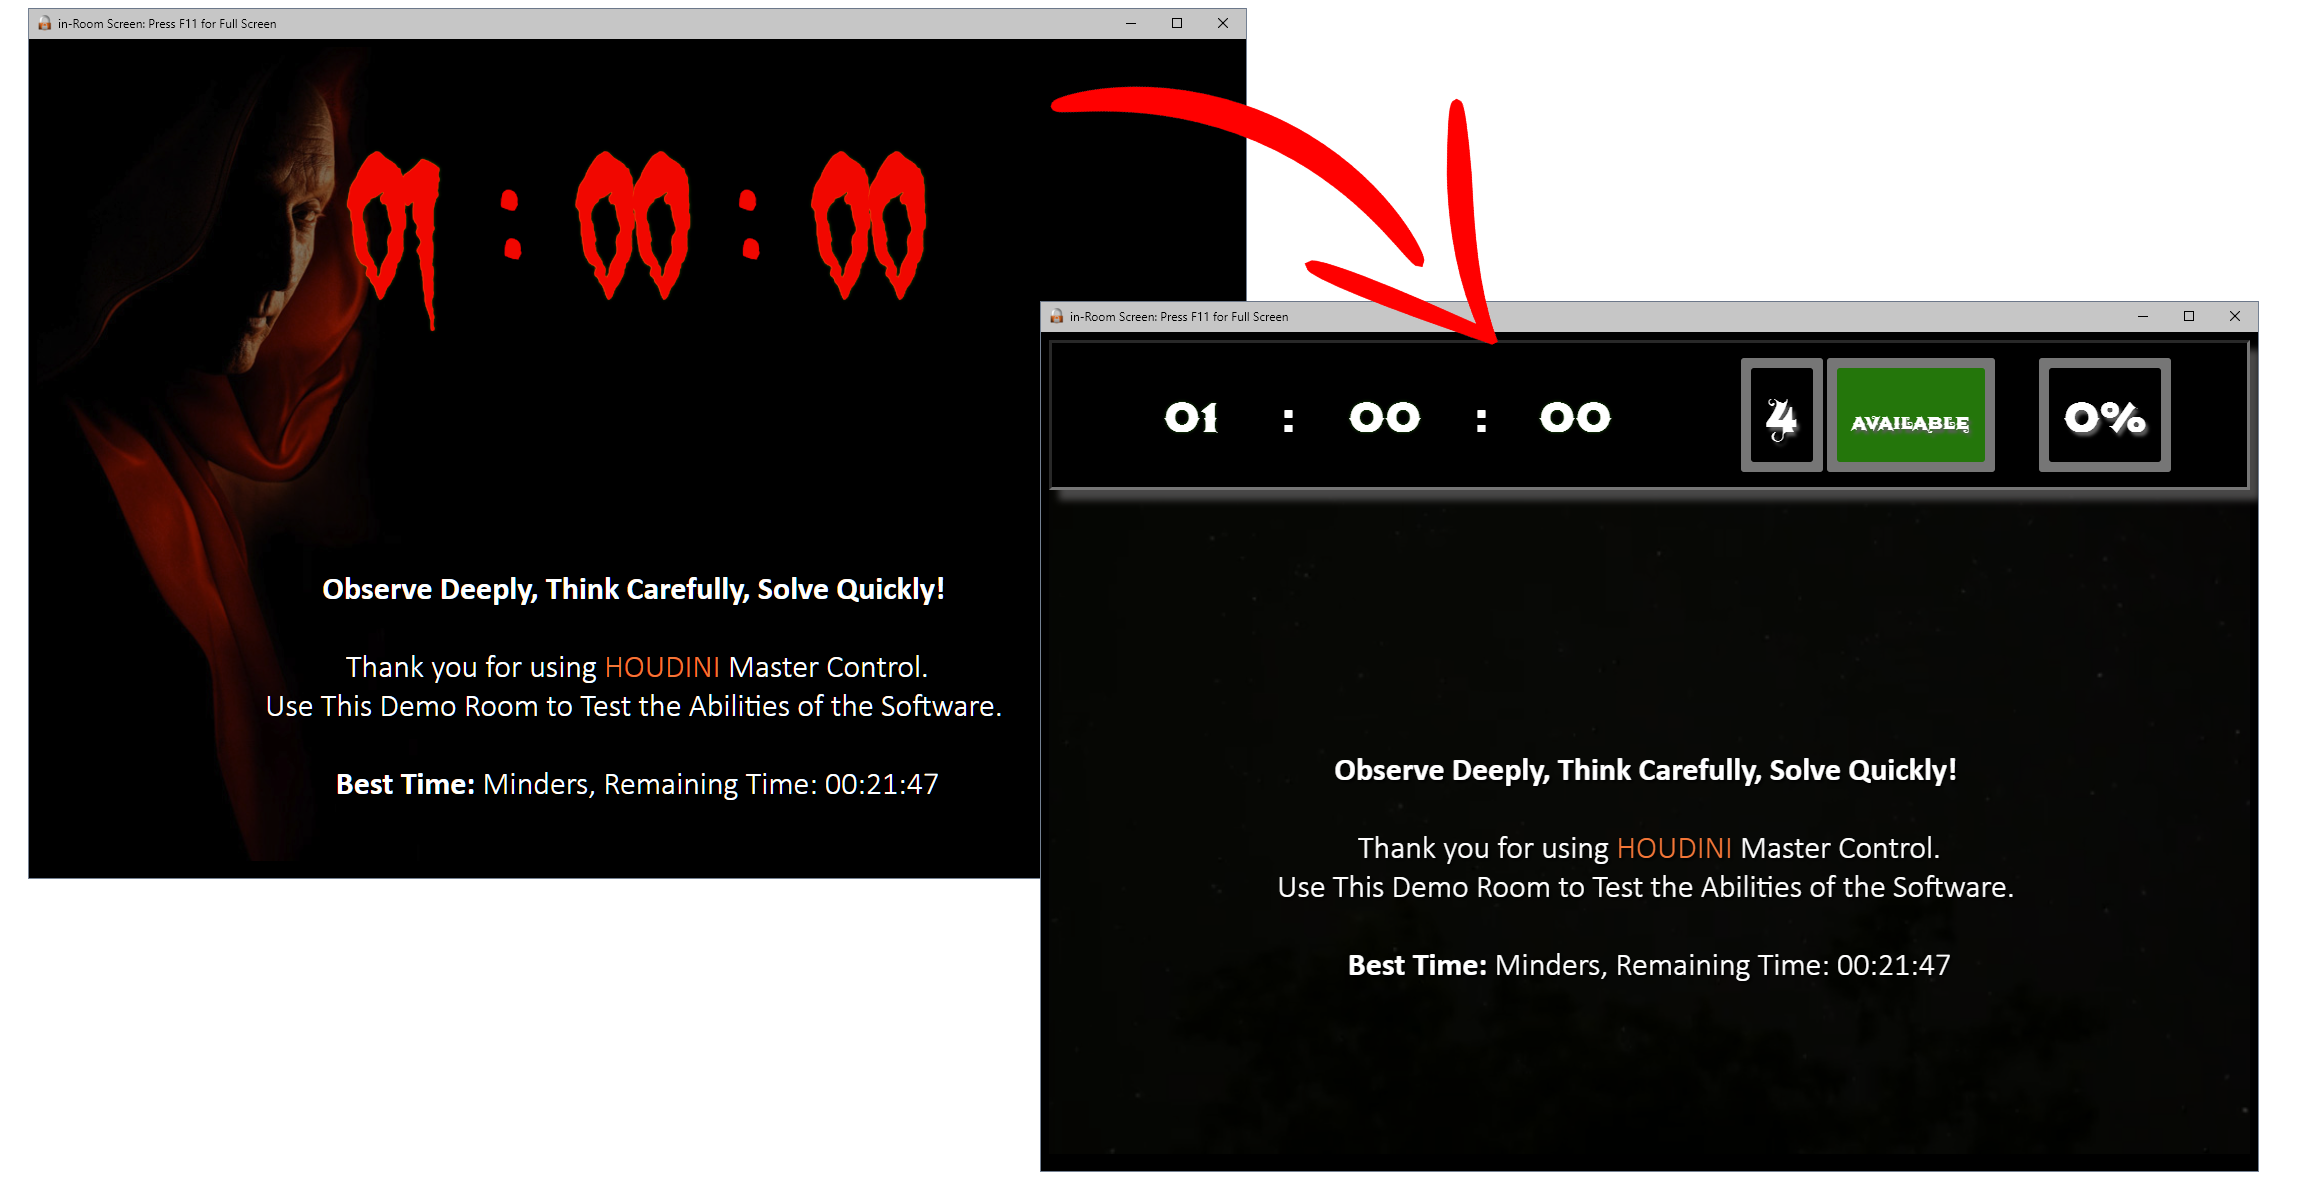
The main differences between the two depicted themes are summarized as follows:
- Different background
- Different fonts and sizes for the countdown timer
- The second theme contains the remaining available clues
- The second theme informs the players that they can ask(or not) for a clue
- The second theme depicts the progress of the players
- A horizontal line separates the information area from the clue area
1. Understanding the content of the header bar
The in-room screen is generally separated into two areas – the information area and the clue area. The information area holds information about the remaining time, the available clues, the availability of the clues, and the game’s current progress. The clue area depicts a brief description of the room and available clues.
The information area may contain three blocks:
- The countdown timer block is hereafter referred to as “CT Block.“
- The number of clues blocks is referred to as “NOC Block.“
- and the Progress bar block, hereafter referred to as “PB Block.“
All these three blocks share the same font as well as the same font size but not the same color information.

- CT Block contains up to 3 sub-blocks – one to display the remaining Hours, one to display the remaining Minutes, and one to display the remaining Seconds.
- NOC block contains two sub-blocks – one to display the remaining available clues and one to display the availability of these clues
- PB block contains only one block to display the game’s current progress.
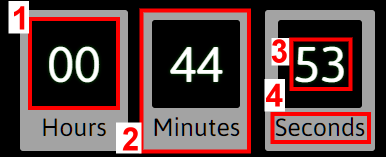
Four variables need to be dealt with to fully define each block’s parameters. These variables control the colors of each block. The following image illustrates these four variables on the CT block. Of course, these parameters are also applicable to the other two blocks. The first one (1) corresponds to the internal color of the block, the second one (2) to the external color of the block, and the third one (3) to the color of the displayed text – in this case, on the color of the countdown timer and the fourth one (4) on the color of the label. One can select a different set of colors for each block, but all the sub-blocks adopt the same variables.
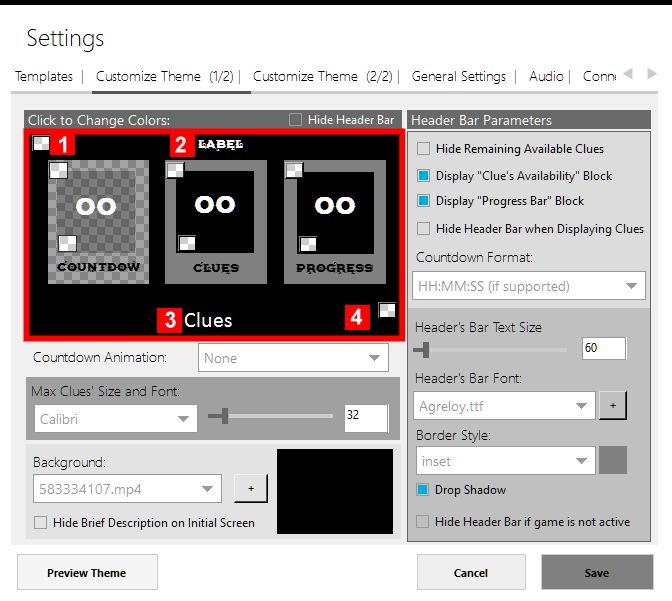
To set these color parameters, use the <Settings->Customize Theme (1/2)> menu. As one can easily observe from the following image, three blocks are illustrated. The first one corresponds to the CT Block, the second one corresponds to the NOC one, and the third one corresponds to the PB block. Click on each region on each block to select the preferred color, or click on the “Transparent” button to set the color of the specific region that is transparent. Moreover, the same part allows you to control four more global parameters. Parameter (1) allows you to select (or set as transparent) the information area’s background color, parameter (2) allows you to select a color for the header of each block, parameter (3) defines the clue’s color, and parameter (4) allows you to select (or set as transparent) the clues area’s background color.
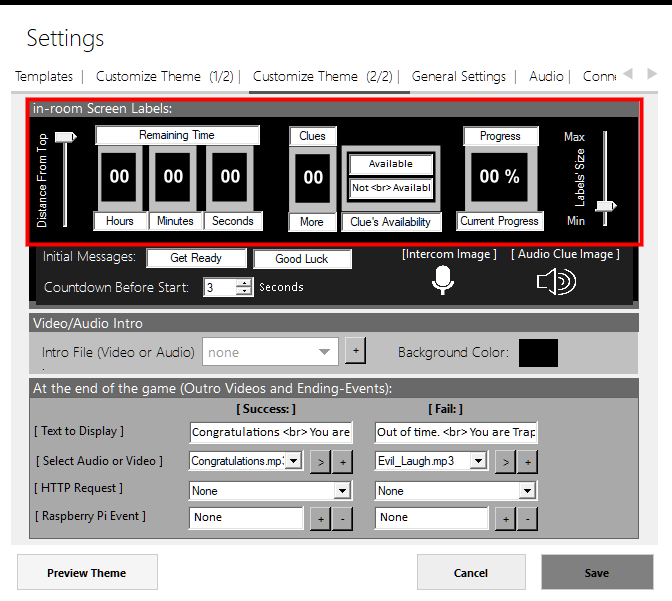
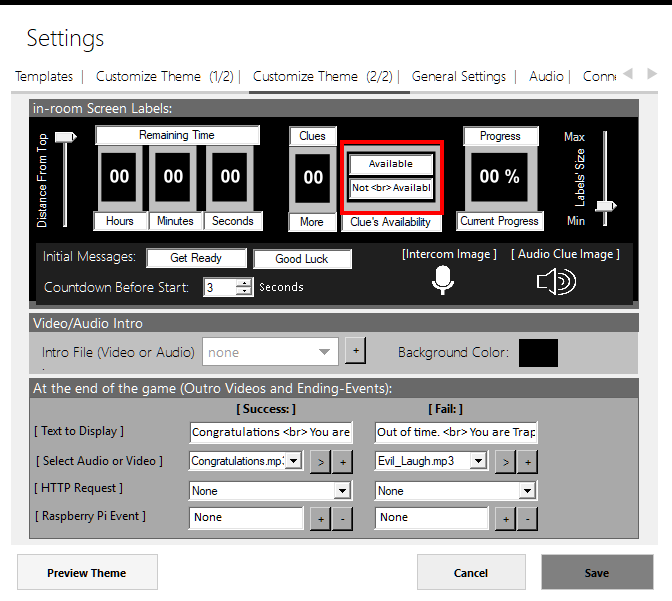
Customize the content of the labels of each block using the <Settings->Customize Theme (2/2)> menu. As illustrated in the following image, using the same menu, one can also customize the label’s size as well as the distance of the labels from the top of the screen
2. Selecting a background
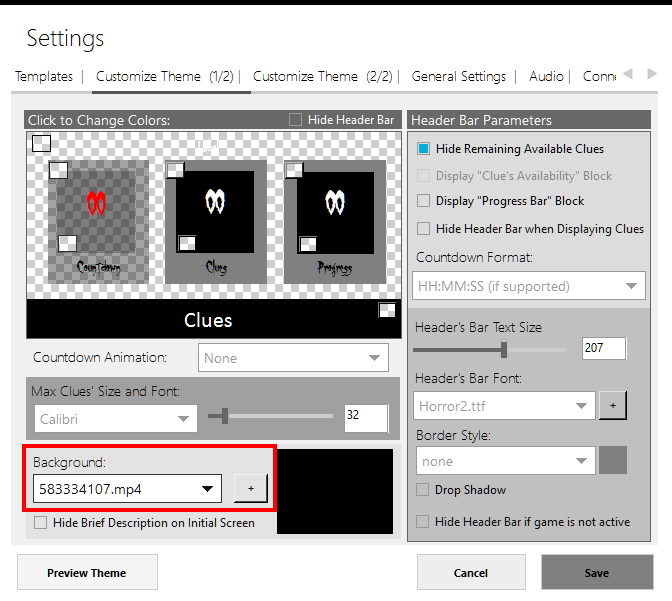
Go on <Settings->Customize Theme (1/2)>, go to the background section, and using the drop-down menu, select the background you want. Alternatively, click the <+> button to upload a new one. Houdini MC supports the following file formats:
- .jpg,.png for static image backgrounds
- .mp4 for video backgrounds
- .gif for animated image backgrounds
The new theme uses the 583334107.mp4 video as background.
3. Change the countdown timer’s font and text size
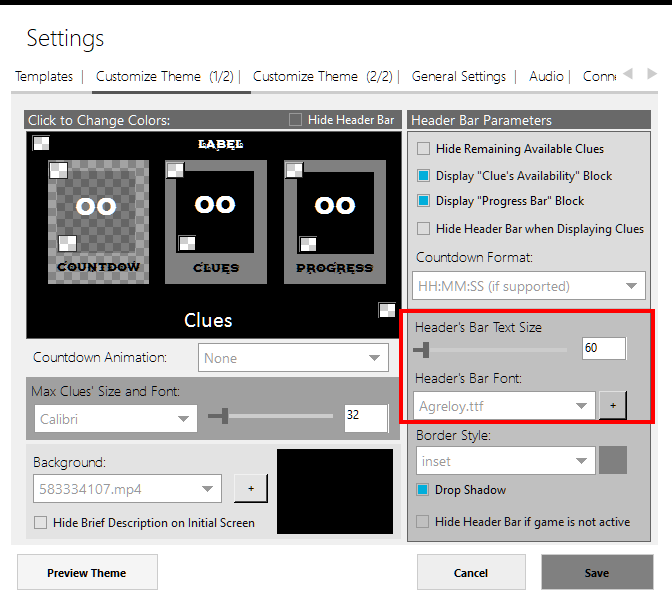
Houdini MC allows you to change the font and the size of the countdown timer. First, use the <Header’s Bar Font> section on the <Settings->Customize Theme (1/2)> menu and either select one of the listed fonts or press the <+> button to upload a custom one. Houdini MC supports .ttf and .otf font files. There is no need to install these fonts on Windows. Similarly, use the <Header’s Bar Text Size> scroll bar to set the font size.
The new theme uses the Agrelot.ttf font (size =60). Please select this file.
Resources: Free fonts
4. Display the remaining available clues
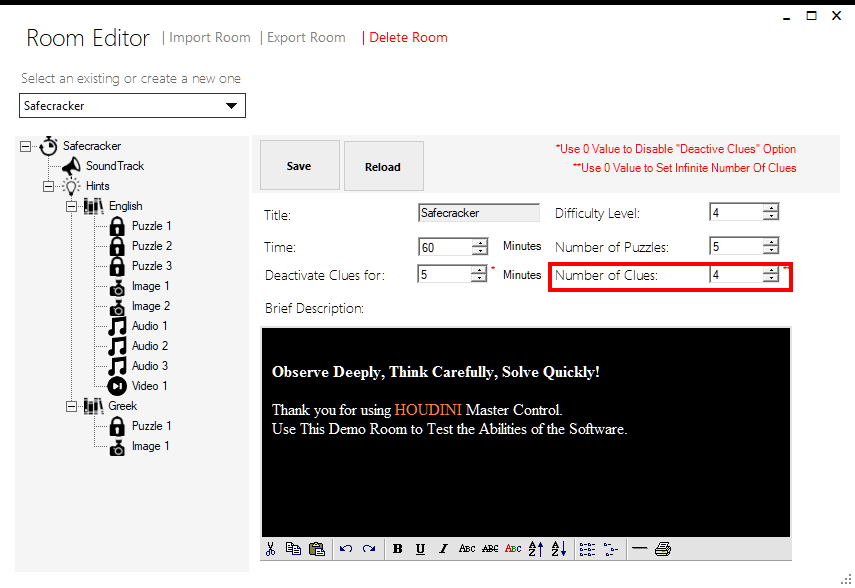
Houdini MC gives the ability to the game-masters to provide a predefined number of clues to the players. To define this number, use <Room Editor>, “Number of clues” filed.
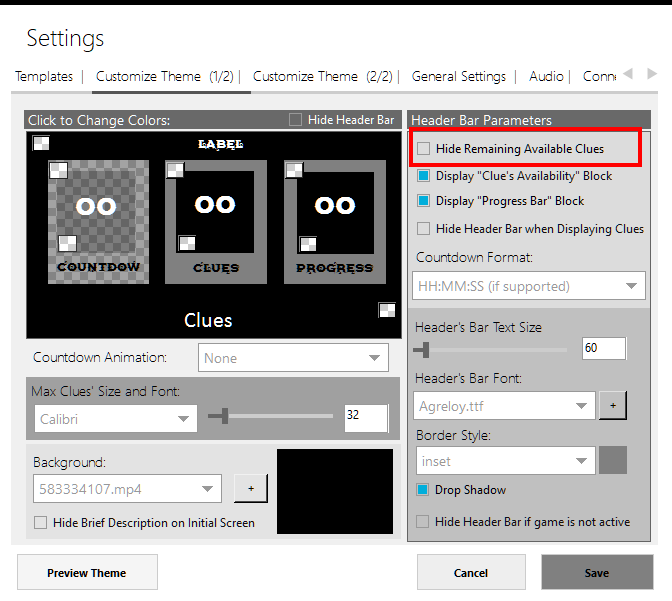
To display to the players the number of the remaining available clues (NOC block), go on <Settings->Customize Theme (1/2)> and click to uncheck the “Hide Remaining Available Clues”. By default, if you choose to provide an unlimited number of clues to your players, even if you uncheck this check box, the NOC Block is not visible.
5. Clue’s availability sub-block
In several escape rooms, especial in Europe, it is a common practice to limit the number of available clues and lock these clues for a specific time period. Players may ask for a clue only after a specific time.
If you want to adopt this approach, use the <Room Editor> and lock the clues for a specific amount of time:
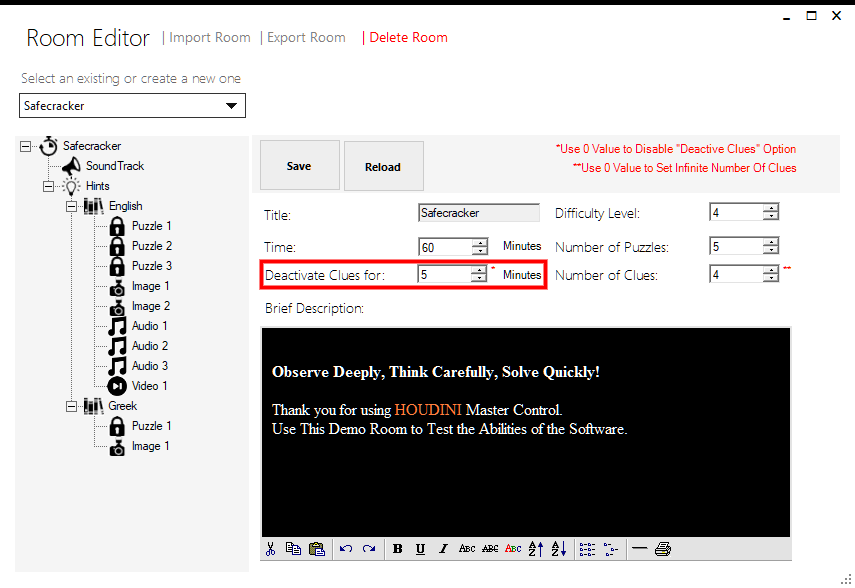
To inform your players whether a clue is now available or not, go on <Settings->Customize Theme (1/2)> and click to check the “Clue’s Availability Block”.

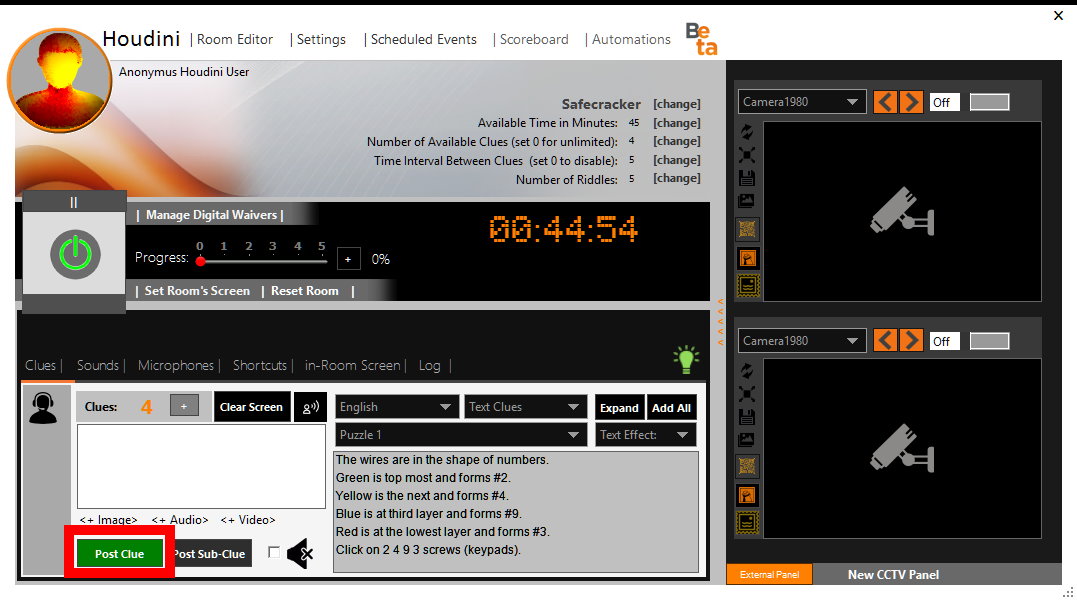
Of course, Houdini MC automatically informs the game-master that the players may ask for a clue. The “Post Clue” button turns green when a clue is allowed.
To customize the labels of the specific sub-block, use the <Settings->Customize Theme (2/2)> menu:
7. Inform the players about their current progress
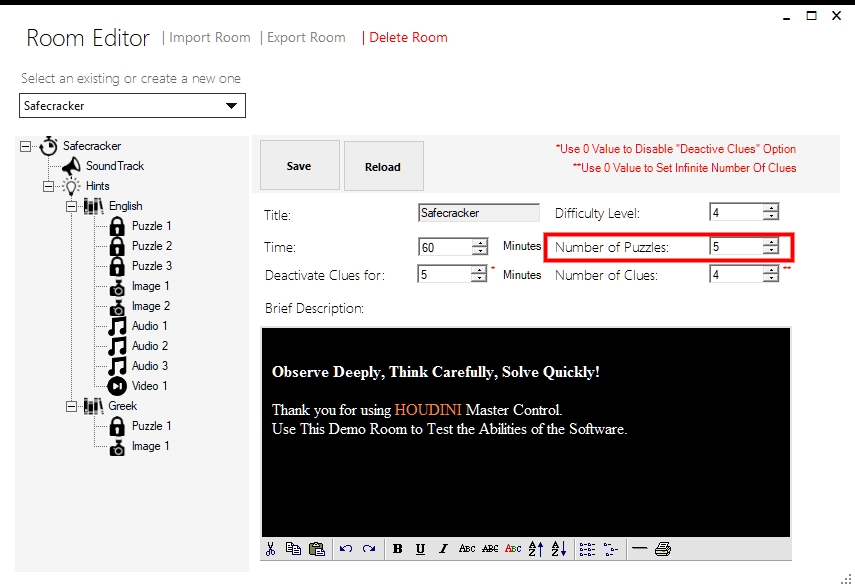
Enhance the game atmosphere by informing your players about their current progress. Again, use the <Room Editor> and define the number of the puzzles:
Now, go on <Settings->Customize Theme (1/2)>, click to check the “Display progress Bar” block, and press <Save>
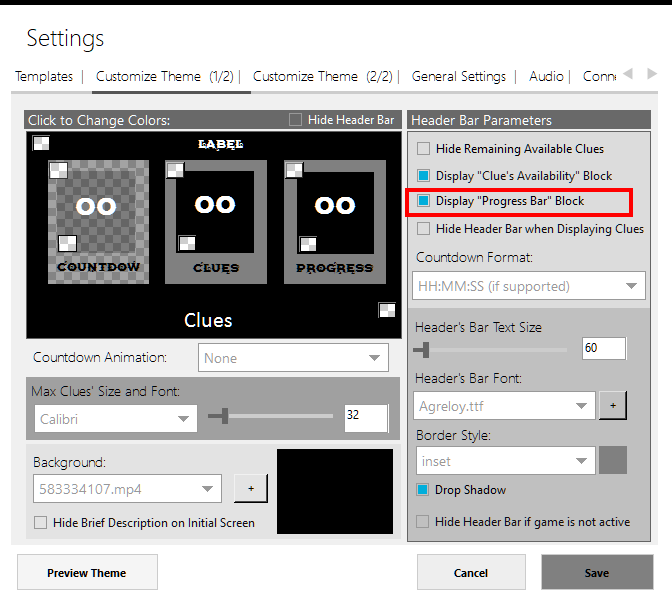
Next to the <Start button>, a progress bar now appears. The maximum value of this progress bar is equal to the number of puzzles. Every time your players solve a puzzle, manually increase the value of the progress bar (or press the <+> button). Automatically, the in-room screen informs the players about their progress.
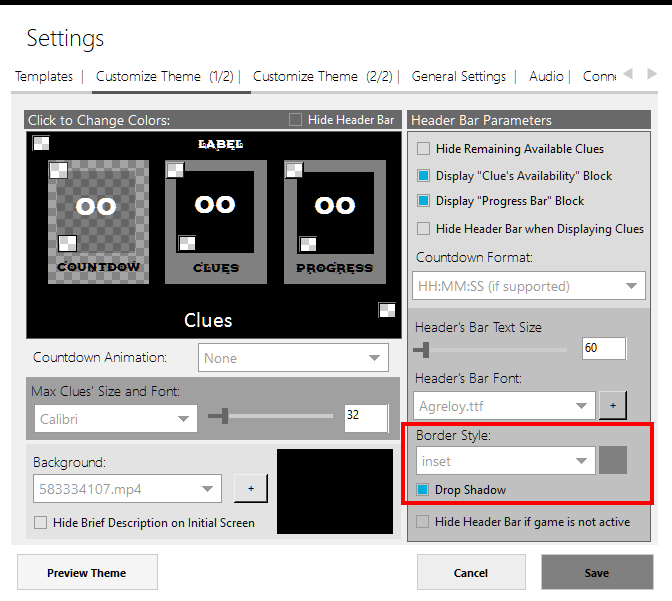
6. Separate the information area from the clue’s area
Go on <Settings->Customize Theme (1/2)> and select as <Border Style> the value “inset”. Also, click on the “Drop Shadow” checkbox!
Of course, this short tutorial describes only a few available customization abilities. Use your imagination and examine the existing templates to shape a unique theme.
Houdini MC allows you to store in a single file all the room parameters, such as
- Clues (text, images, video, audio)
- Theme
- Soundtrack
- Automations
- Scoreboard
- Hue Lights, animations, and scenes
- etc
Simply go on Settings-> General Settings and select Export All. This will generate a single file with all the room parameters. Save this file to a safe location. Repeat this procedure for all the rooms.

Every time you want to load this file to operate the specific room, simply go on Settings-> General Settings and select Import All.