Connecting a push-button with Houdini MC was never easier. You will need only a Raspberry Pi and a push button.
To start with, execute Houdini MC and go to “Settings->Connections” tab. Enable the “Incoming HTTP Requests” and note down the given URL. Please make sure that your router always assigns Houdini’s PC the same IPv4 address. From this moment, Houdini MC is ready to receive basic incoming requests. Close the settings menu.
You will notice a green bulb icon on the top of the console. This icon indicates that Houdini is ready to accept incoming requests. To test the ability of the software, use your tablet/mobile device and point a browser tab at the noted URL. In my case, the URL for “Clue Button” is 192.168.178.101:14999/clue while the URL for “Panic Button” is 192.168.178.101:14999/panic . Please make sure that both, Houdini MC and your mobile device are connected to the same local network. After sending the request, you will notice that the color of the bulb icon changes, based on the type of the request.
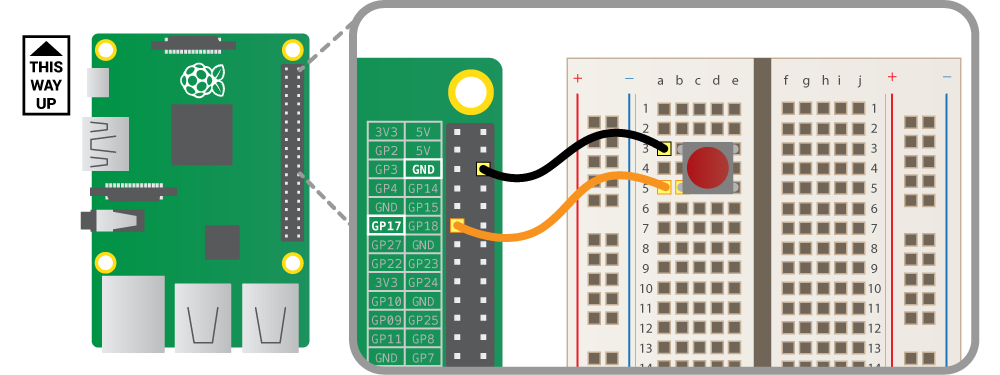
How can I transmit these requests from a Raspberry Pi? As mentioned earlier, you will need a Raspberry Pi of course and a push button. Connect the push button on Raspberry Pi as illustrated in the following figure. For Example, use GPIO Pin 17 for the first wire and GRD pin for the second one.

Make sure that Raspberry Pi is connected to the same local network with Houdini MC. Then execute the following code:

In Case of Python3:

That’s all. Now your players can request for a clue by pressing this button 😉
