
Connecting Arduino devices with Houdini MC was never easier.
Houdini MC interacts with Arduino and Arduino-like devices using GET requests. To start with, go on “Scheduled Events” and select “Add Event”
Select “Incoming Event from Smart Mechanism”

Use a “Custom_Term” and write down the entire URL (e.g. http://192.168.178.104:14999/Custom_Term)
Select action (e.g. play a sound, trigger another device, play video, control HUE scenes, etc.)
Press “Save Event”
Now, back on your Arduino. You will need a WiFi Ethernet Shield (follow a similar procedure to interact using a wifi shield).
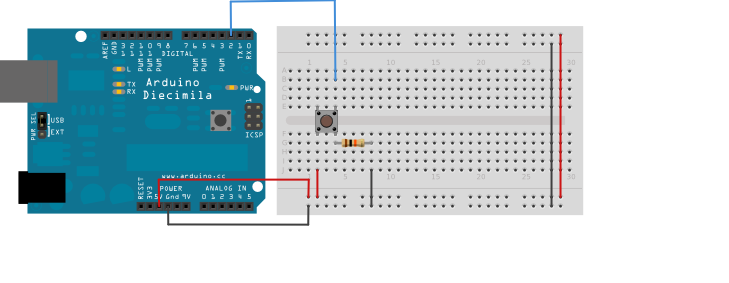
The easiest way to shape a GET request is the following. Connect a push- button as shown in the figure above. Then use the following code:
#include <SPI.h>
#include <Ethernet2.h>
// this must be unique
byte mac[] = {
0xFE, 0xE7, 0xDE, 0xB0, 0xDC, 0x9B };int systemState = 0;
// change to your network settings
IPAddress ip(192,168,1,110);
IPAddress gateway(192, 168, 1, 1);
IPAddress subnet(255, 255, 255, 0);
// change to your server
IPAddress server(192,168,178,104);
char serverName[] = “192.168.178.104”;
// change to your server’s port
int serverPort = 14999;
EthernetClient client;
int totalCount = 0;
char pageAdd[64];
//buttonPin
const int buttonPin = 2; // the number of the pushbutton pin
void setup() {Serial.begin(9600);
// disable SD SPI
pinMode(4,OUTPUT);
digitalWrite(4,HIGH);
//button pin mode
pinMode(buttonPin, INPUT);
// Start ethernet
Serial.println(“Starting ethernet…”);
Ethernet.begin(mac, ip, gateway, gateway, subnet);Serial.println(Ethernet.localIP());
delay(2000);
Serial.println(“Ready”);}
void loop() {
if (systemState == 0){
pushButton();
}}
byte getPage(IPAddress ipBuf,int thisPort, char *page)
{
int inChar;
char outBuf[128];Serial.print(F(“connecting…”));
if(client.connect(ipBuf,thisPort) == 1)
{
Serial.println(F(“connected”));sprintf(outBuf,”GET %s HTTP/1.1″,page);
client.println(outBuf);
sprintf(outBuf,”Host: %s”,serverName);
client.println(outBuf);
client.println(F(“Connection: close\r\n”));
}
else
{
Serial.println(F(“failed”));
return 0;
}
// connectLoop controls the hardware fail timeout
int connectLoop = 0;
while(client.connected())
{
while(client.available())
{
inChar = client.read();
Serial.write(inChar);
// set connectLoop to zero if a packet arrives
connectLoop = 0;
}connectLoop++;
// if more than 10000 milliseconds since the last packet
if(connectLoop > 10000)
{
// then close the connection from this end.
Serial.println();
Serial.println(F(“Timeout”));
client.stop();
}
// this is a delay for the connectLoop timing
delay(1);
}Serial.println();
Serial.println(F(“disconnecting.”));
// close client end
client.stop();
return 1;
}
//Send get request to Houdini if the button was pressed
void pushButton(){
if(digitalRead(buttonPin) == HIGH){
// send a request to Houdini
sprintf(pageAdd,”/Custom_Term”); (!getPage(server, serverPort, pageAdd));
Serial.println(“Button pressed”);
systemState == 1;}
}
Very special thank to:
- Hour To Midnight – Room Escape Games in Portland, Oregon USA
- ???????? ????????
Arduino UNO-ethernet Shield
This section hosts an interesting and self-explanatory tutorial on how to interact with Arduino UNO-ethernet Shield. Please check the following presentation and the attached files:
8 Input 6 output UNO.fzz – the layout
Uno-Interface__two_way_08-05-21_Debounce.ino – the source code
Very special thanks to Ed Wolf and Hour To Midnight – Room Escape Games in Portland, Oregon USA. for this excellent tutorial.